What is the MoDaPo?

Download

GitHub - immunoodle/data-portal

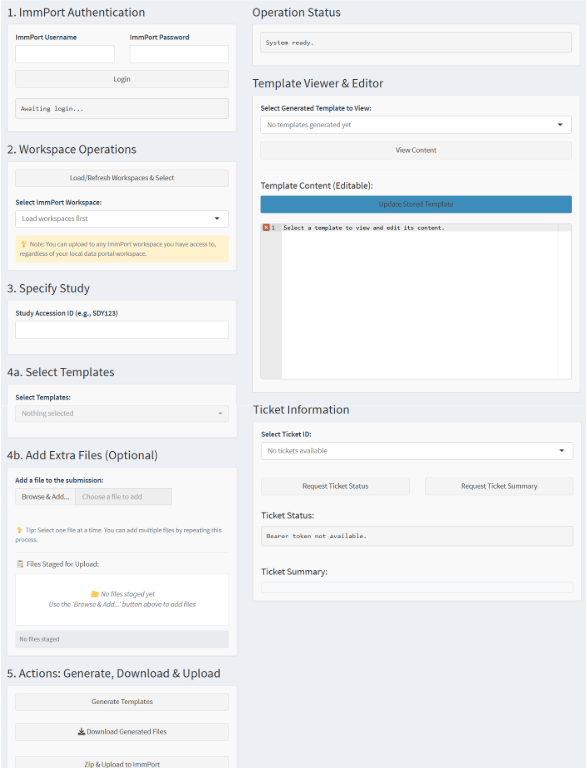
The Mobile Data Portal (MoDaPo) s a tool to seamlessly integrate data sharing into research projects.  The integrated workflow system of the MoDaPo addresses the complex challenge of transforming research database content into ImmPort-compliant submissions through a three-layer architecture that separates concerns while maintaining data integrity throughout the pipeline. The system is built around the official ImmPort data model and incorporates the requirements specified in the ImmPort Data Management and Sharing Plan template. 

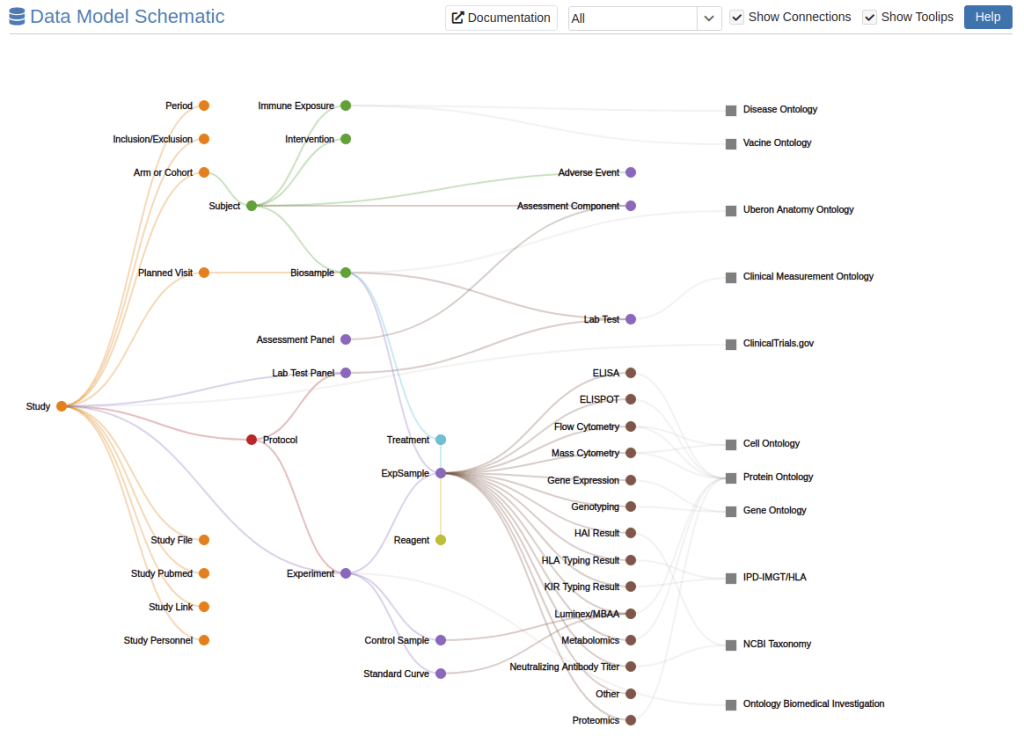
Figure: ImmPort Data Model

The three primary layers that form a complete data processing pipeline are: 

  1. Data Extraction Layer (Python): Handles database connectivity, query execution, and initial data transformation into intermediate formats

  2. Transformation and Curation Layer (R Shiny): Provides interactive data processing, validation, human-in-the-loop curation, and submission preparation 

  3. Submission Layer (API Integration): Manages authentication, file upload orchestration, and real-time submission status tracking

The data extraction layer implements a sophisticated database abstraction. The implementation is built primarily in Python, leveraging production-grade libraries including psycopg2-binary for PostgreSQL connectivity, python-dotenv for secure configuration management, and custom connection pooling for high-throughput operations. The system currently supports PostgreSQL databases with a plugin architecture designed for extension to other database management systems including MySQL, Oracle, and cloud-based solutions.

The architecture implements several key design principles: 

  • Modularity: The system is decomposed into distinct, loosely-coupled components that can be developed, tested, and deployed independently, enabling maintenance and extension without affecting other system components. 

  • Data Integrity: Every transformation step maintains complete audit trails and implements validation checkpoints to ensure data consistency from source database to final repository submission. 

  • Extensibility: The plugin-based architecture supports easy addition of new data sources, transformation rules, and target repositories beyond ImmPort. 

  • User-centric Design: The system provides intuitive interfaces for both technical and non technical users, recognizing the diverse skill sets within research teams while maintaining sophisticated functionality for power users. 

  • Compliance-First Approach: All transformation logic is explicitly designed around ImmPort’s official schema requirements and validation rules, ensuring submissions meet repository standards before upload. 

Database connections are established using environment-based configuration with encrypted credential storage, ensuring no sensitive information is embedded in source code. The system supports connection pooling and automatic retry logic for production reliability. 

The system supports flexible deployment configurations designed for various institutional environments from single-user installations to multi-user production deployments. Multiple simultaneous database connections can be configured, supporting complex research environments with federated data sources or multiple study databases.

 Components of the MoDaPo

UPLOAD TO IMMPORT

Starting your data transfer

The MoDaPo is a clone of the ImmPort data model, so as long as the data portal is filled out well, the upload to ImmPort should be quite easy. Immunoodle is able to easily transform your stored data into ImmPort compliant templates, makes the data transfer easy, and provides you with validation updates about your data uploads. First, though, you have to go to the ImmPort website to complete some set-up steps.

  1. In order to make the data transfer from the data portal to ImmPort, the first thing you will need to do is create a free account on ImmPort. 

2. Next you will have to create a new workspace on ImmPort (or, if you have created one in the past, you can use a pre-existing workspace). 

3. If you are working with others, you can add them to your ImmPort workspace, and then they too will be able to upload data there. 

4. You are then ready to start using MoDaPo for data transfer

Template Submission

Data Submission Process Guide – ImmPort Documentation gives an overview of how to upload data to ImmPort. Not all of the templates listed are required, but the more robust the data the better. The upload order is as follows (each template is linked with the relevant ImmPort documentation):

  1. basic_study_design.json, protocols.json, Protocol files (These are the protocols you list in the protocol template; ImmPort supports most formats), Study files (the files listed under Study Files in basic_study_design)

    1. One of the elements of the basic_study_design template is arm_or_cohort. Arms (or cohorts) are ways to group study subjects by certain criteria such as age or treatments. For example, in a study looking at vaccine response in mothers and infants (SDY2821 on ImmPort), there were 4 arms: non-pregnant women, pregnant women, infants from non-vaccinated mothers, and infants from vaccinated mothers. When you enter the subject information into ImmPort, each subject will be associated with an arm to better keep track of them as you add more data.

    2. Another element required in the basic_study_design template is planned_visit. Here, each planned visit of the study is assigned an identifier which will be referenced again in other templates, such as assessments and biosamples. If you have an initial visit (day 0), and plan on seeing a subject again in 2 months (day 60), these timepoints will be associated with data collected, which helps with data interpretation later on.

  2. subjectHumans.json/subjectAnimals.json

  3. adverseEvents.json, interventions.json 

  4. assessments.json (or assessmentpanel.json and assessmentcomponent.json)

    1. Assessments is a very useful tool because it can hold many different data types. It usually holds data collected about study participants during their visits, and can consist of anything from vital signs to sociodemographic questions to vaccination status. Each assessment is associated with a specific subject and a specific planned visit, so each assessment is specific to a subject and visit.

  5. experiments.json

  6. bioSamples.json, treatments.json

  7. labTests.json (or labTestPanels.json and labTest_Results.json)

  8. Assays (It doesn’t matter what order you upload these in, but for each assay there are multiple templates to upload together; Right now we don’t have our template generator set up to address Mass Spectrometry, KIR, Image Histology, Genotyping, Gene Expression, or Flow Cytometry; Also, if you have data from an experiment type ImmPort does not have, you can upload data into any of the ones they do have that fits your data well)

    1. ELISA_Results.json, experimentSamples.ELISA.json, reagents.ELISA.json

    2. ELISPOT_Results.json, experimentSamples.ELISPOT.json, reagents.ELISPOT.json

    3. CyTOF_Derived_data.json, experimentSamples.CyTOF.json, reagents.CyTOF.json, Reagent_Sets.json

    4. HLA_Typing.json, experimentSamples.HLA.json, reagents.HLA_Typing.json

    5. HAI_Results.json, experimentSamples.HAI.json, reagents.HAI.json

    6. controlSamples.json, MBAA_Results.json, experimentSamples.MBAA.json, reagents.MBAA.json, standardCurves.json

    7. Virus_Neutralization_Results.json, experimentSamples.Virus_Neutralization.json, reagents.Virus_Neutralization.json

    8. experimentSamples.Neutralizing_Antibody_Titer.json, reagents.Neutralizing_Antibody_Titer.json

    9. PCR_Results.json, experimentSamples.PCR_QRT.json, reagents.PCR.json

 Data Upload

Once you are set up in Immport, the process of uploading the templates is fairly straightforward. You do not have to go back to the ImmPort site.

  1. Log into the data portal and go to the “Upload to ImmPort” tab (where the instructions of use are written out).

  2. Log in with your ImmPort credentials

  3. Select a workspace to which you want to add data

  4. Enter the study id under which you have stored the specific study data in the data portal that you want to upload

  5. Select the specific templates that you want to upload.

  6. Add any additional files that you want to add to your upload (eg. protocols)

  7. Generate the template. Check to make sure the data looks how you expect. If there are any last minute changes you want to make, you can adjust things in the “Template Viewer & Editor”, make sure to click “Update Stored Template”, and your corrections should be in the eventual upload.

8. Choose what to do with your template. If you want, you can jump right in to uploading templates using the “Zip and Upload to ImmPort” button in the data portal. When doing this, make sure that you let ImmPort have time to process your files before you submit more files referencing those you just uploaded. ImmPort will send you an email to confirm that your templates went through successfully. On the other hand, if you are worried that your files are not going to upload successfully, I recommend that you use the “Download Generated Files” button (you will have to un-zip the downloaded files), and then go to the ImmPort website and use the Validate Data tab. This tab gives you a fairly instant report about what problems there are not allowing your data to upload successfully. If you directly Upload Data, you get the same report, it just comes back a bit slower. 

When you upload data through the data portal, you get an immediate pop-up in the bottom right hand corner to confirm the upload was successful. You will also receive a report in the upper right hand corner, in a box called “Operation Status”, on whether the upload went through, and what ticket number is associated with the upload. You can then go down to the “Ticket Information” box to track the progress of your upload in ImmPort. Once ImmPort is done looking at the file, the status will change from “Pending” to something else, most likely “Rejected” or “Completed”, and you will be sent an email with the validation report. 

Both your Validate Data and Upload Data histories are saved on the ImmPort website, so you can go back and look at them at a future date. One benefit of using Validate Data as well as Upload Data is that I find it easier to have one space that mostly has the successful uploads (the Upload Data tab) in its history, and a different location to look at the history of errors I ran into (the Validate Data tab)

 Fixing Errors

There are a few common reasons you might run into an error in trying to upload your data. 

  • If you have data for a template, but no template is generated in the data portal, it is because there is no data in one of the required fields.

  • Once you start the upload to Immport, again, the most common error to run into is that you are missing a required data field. Although some of the required elements are accounted for on the data portal side, not all of them are. See an example error message below for a missing value in the “Sex” column in the subjectHumans template.

      Error Missing conditional required value The Rule check “Required Column” for Field “Sex”.  The row  has ID field(s) “subject_user_defined_id” and value “Subject1”
  • Make sure you are uploading all the required templates and documents for something at the same time (ex. you must upload the protocol template at the same time as the basic study design template, as well as the protocols mentioned in those 2 templates). See an example error message below where the protocol template was not added at the same time as the basic study design template.

      Error User defined ID cannot be found in package or database The user defined ID field(s) “user_defined_id” with value “protocol4” in the Table protocol
  • The ids you use to upload data should not be in the format that ImmPort uses to assign accessions because the uploader will think you are referring to something that already exists on their site. The following example failed because TRT is the character marking ImmPort uses to demarcate the treatment accessions that they assign. The errors for these will usually reference an accession missing and a foreign key check.

      Error Accession is missing The Foreign Key check “getAvailableAccsToParentMap” for Field “Treatment ID(s)” using Table “treatment” and Accession “TRT1”
  • Some values must be in the lk tables ImmPort has on their website (Lookup Tables – ImmPort Documentation). You can always reach out to the folks at ImmPort if something you need is not listed in the lk tables.

  • Another thing that will not result in a “Rejected” status, but instead will record as “Archived_Only_Not_Processed” is if the file name for the template you are loading is not exactly what ImmPort expects. If the file name is changed at all, it will not upload. For example, if you upload a file named “bioSamples (1).json” instead of “bioSamples.json”, you would get the following message:

     bioSamples (1).json Stored in:file_info WARNING: File is not used in upload and is being archived only